You can replace a shower head and hose in 20–40 minutes using basic tools.
I’ve replaced dozens of shower heads and hoses, so I’ll walk you through how to replace shower head and hose with clear steps, smart tips, and real-world fixes. This guide covers tools, parts, step-by-step instructions, troubleshooting, and things I’ve learned the hard way so you can finish the job fast and avoid common mistakes.

Why replace your shower head and hose?
Old shower heads and hoses clog, leak, or wear out. Replacing them can restore water pressure, save water, and refresh the look of your bathroom. Knowing how to replace shower head and hose gives you control and often saves you a service call.
Many modern heads add features like low-flow savings, multiple sprays, or easy-clean nozzles. A new hose solves kinks and leaks in handheld systems. If you want a quick win for comfort and efficiency, swapping the head and hose is one of the easiest upgrades you can do.

Tools and materials you'll need
- Adjustable wrench or small crescent wrench — to remove and tighten fittings.
- Slip-joint pliers (optional) — for stubborn parts.
- Soft cloth or rag — to protect finishes when using tools.
- Plumber’s (Teflon) tape — for a watertight thread seal.
- New shower head and compatible hose — check size and type first.
- Rubber washers (often included with new hose) — replace worn washers.
- Small brush or old toothbrush — to clean threads and remove mineral build-up.
Tip: Keep a bucket or towel nearby to catch drips and protect the tub surface. Having parts laid out cuts down on mistakes when doing how to replace shower head and hose.
Step-by-step: how to replace shower head and hose
- Turn off the water at the shower valve or main shut-off. If you cannot isolate the shower, leave the shower control in the off position and close nearby fixtures. This prevents surprises when you disconnect the hose or head.
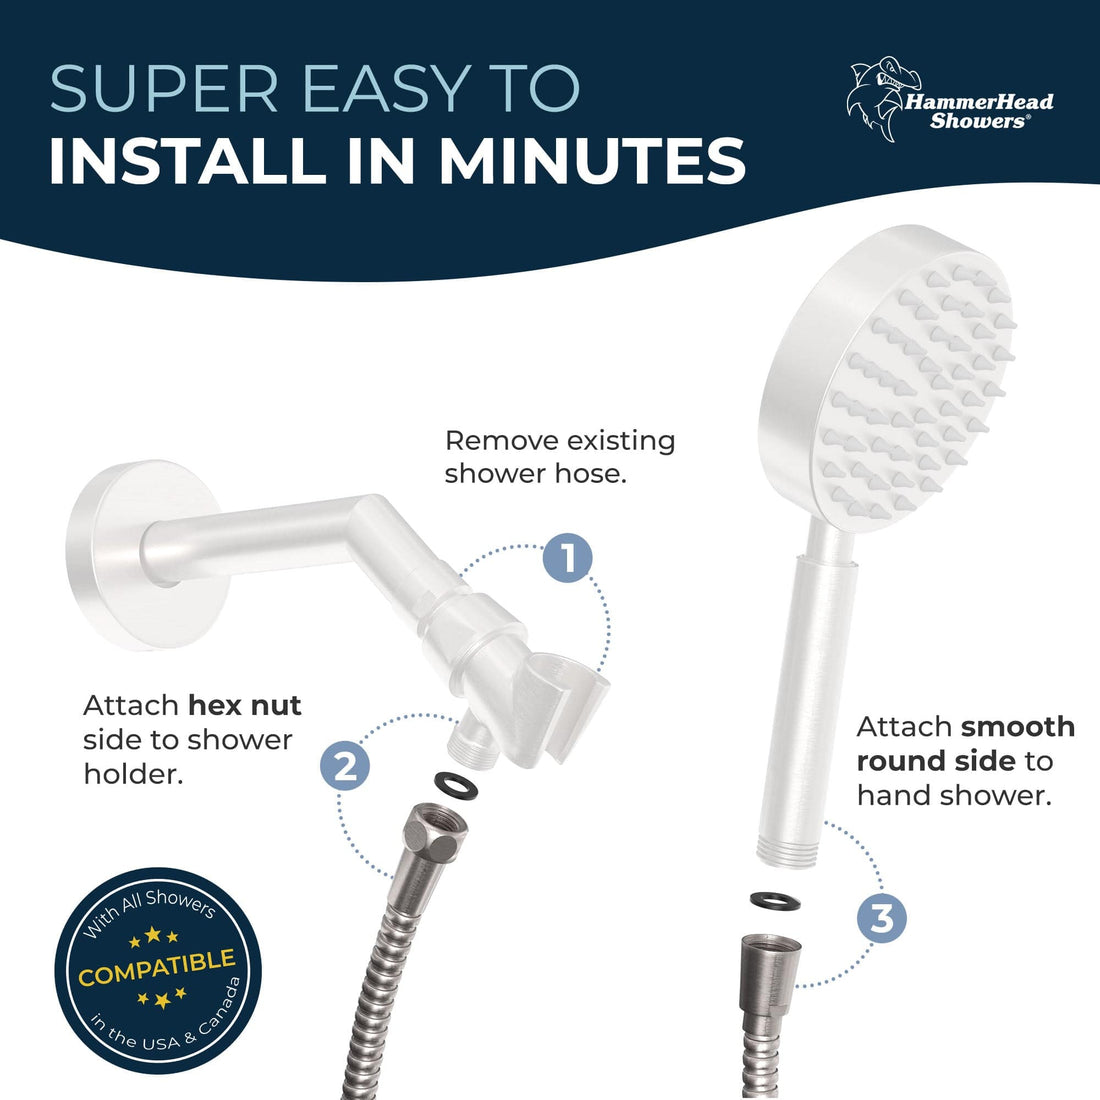
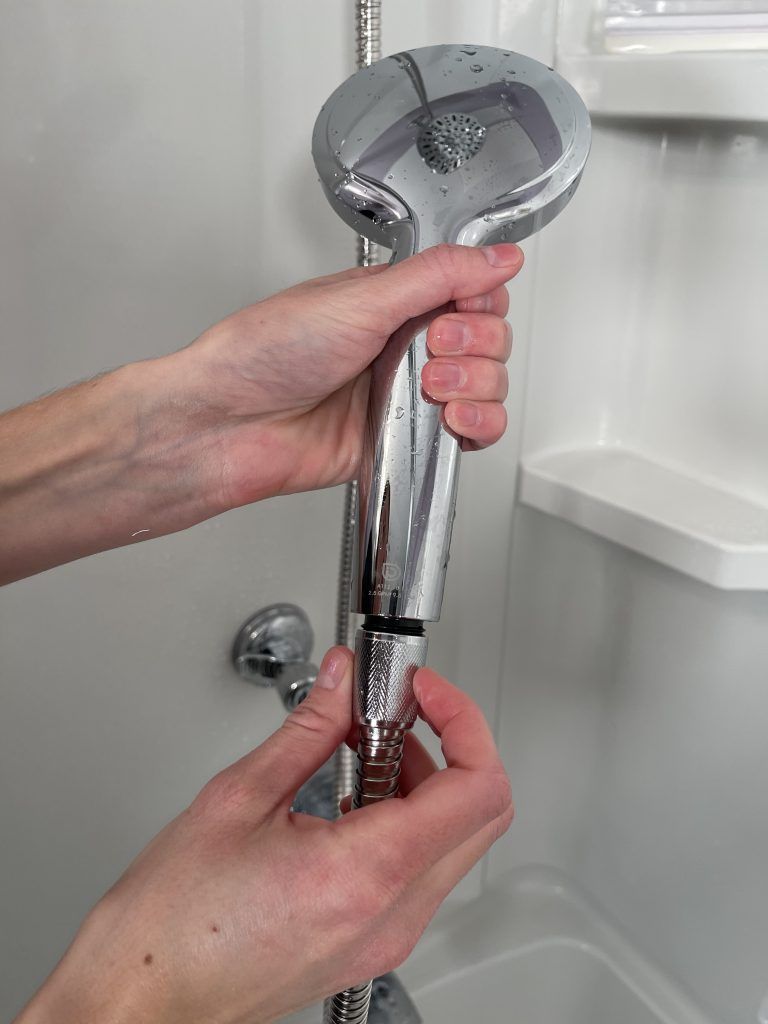
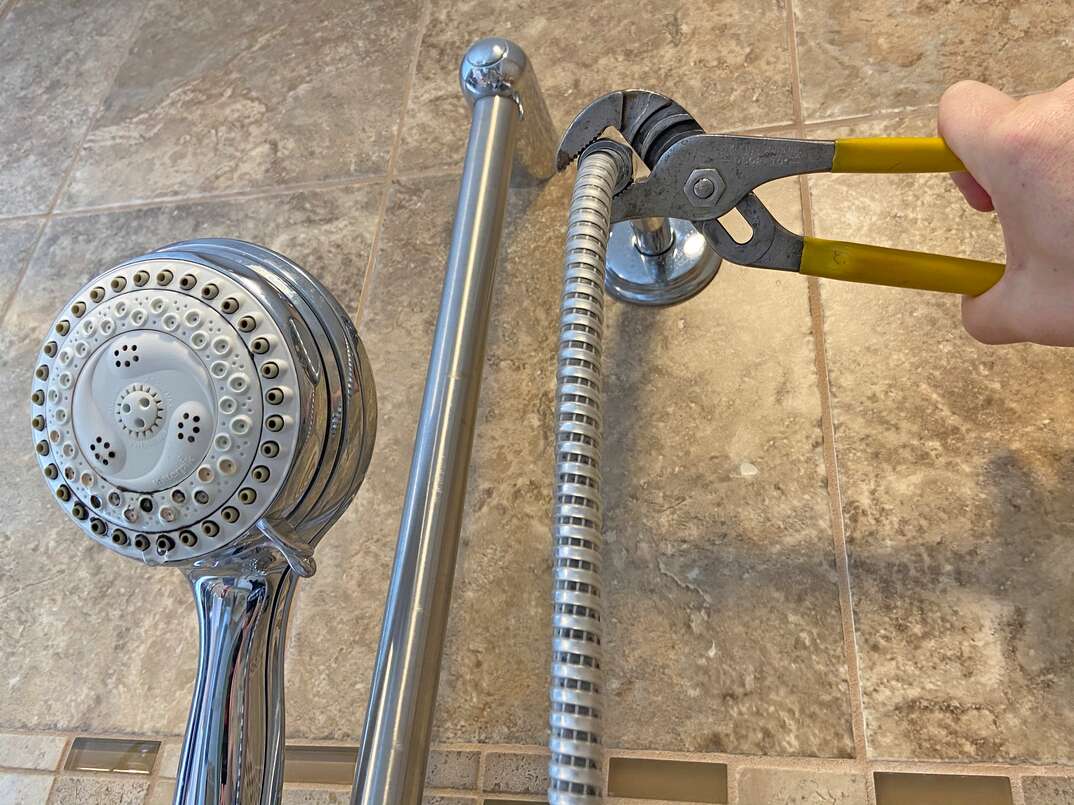
- Remove the old shower head. Grip the head or arm with a cloth to avoid scratches. Turn counterclockwise with your hand first, then use the wrench if needed. I always wrap a rag around the fitting to protect chrome.
- Disconnect the hose. Many hoses unscrew at the handheld and at the wall or diverter. Hold the fixed fitting with pliers and unscrew the hose by hand to avoid twisting internal parts.
- Clean the threads and inspect fittings. Remove old tape and mineral deposits with a brush. Check for damaged threads or a worn inlet; a bad fitting may need replacement.
- Apply fresh plumber’s tape. Wrap the male threads clockwise 3–4 turns so the tape won’t bunch when you screw the new part on. For how to replace shower head and hose, proper tape use prevents leaks almost every time.
- Attach the new hose. Thread the hose onto the outlet by hand until snug. Make sure the rubber washer is in place inside the hose end. Tighten the nut gently with the wrench; hand-tight plus a quarter turn is often enough.
- Install the new shower head or handheld. Screw it onto the arm or hose end by hand. Use the cloth and wrench for a final snug — do not over-tighten, which can crack fittings or strip threads.
- Test for leaks. Turn the water on slowly and check every connection. If you see leaks, turn off water, tighten slightly, or reapply tape as needed.
My experience: I once overtightened a chrome handpiece and cracked the plastic collar. Hand-tighten, then quarter-turn with a wrench. This mistake taught me patience when learning how to replace shower head and hose.

Choosing the right shower head and hose
- Thread size and type — Most US fixtures use 1/2-inch NPT or 1/2-inch BSP threads. Confirm compatibility before buying.
- Hose length — Common lengths are 59 inches and 79 inches; choose based on reach and shower layout.
- Material — Stainless steel or braided metal hoses last longer than vinyl. Metal feels higher quality and resists kinking.
- Flow rate — Look for flow rates labeled in GPM (gallons per minute). Low-flow heads (1.8–2.5 GPM) save water without losing comfort in many cases.
- Mount type — Fixed head, handheld, or combined systems. For handhelds, ensure the diverter or bracket matches your new hose and head.
When you shop, bring a photo or measure the existing connections. Knowing how to replace shower head and hose starts with picking compatible parts that match your plumbing and style.
Common problems and troubleshooting
Leaking at the connection
- Cause: Missing or damaged washer, bad tape application, or cross-threading.
- Fix: Turn off water, remove the part, replace washer, reapply tape, and reinstall hand-tight plus a small wrench turn.
Low water pressure
- Cause: Mineral buildup in the head, kinked hose, or flow restrictor.
- Fix: Unscrew head, soak in vinegar to descale, inspect and straighten the hose, or remove flow restrictor if allowed.
Noisy or sputtering spray
- Cause: Air in lines or clogged nozzle.
- Fix: Run hot water for a minute and clean nozzle holes with a soft brush.
Diverter problems with handhelds
- Cause: Worn diverter valve or buildup.
- Fix: Clean the diverter, replace internal seals, or replace the diverter assembly if faulty.
If troubleshooting fails, the leak may come from behind the wall or from a damaged valve. That’s a sign to call a pro. These tips reflect real work I’ve done while replacing and fixing shower setups and show what to expect when you learn how to replace shower head and hose.
Maintenance tips to extend life
- Clean nozzles monthly by rubbing silicone tips or soaking the head in vinegar for 30 minutes to remove scale.
- Inspect the hose and washers every 6 months for cracks or flattening; replace washers when stiff or cracked.
- Avoid overtightening; hand-tight plus a small wrench turn prevents damage.
- If you have hard water, install a small inline filter or descale more often.
- Keep spare washers and tape in your bathroom kit so repairs are quick.
A simple habit like wiping down the head after heavy use prevents mineral buildup. My rule: check fittings whenever you clean the shower, and you’ll rarely need to relearn how to replace shower head and hose.
Cost, time, and when to call a pro
- Cost — Basic replacement shower heads and hoses can cost $15–$50. Higher-end models run $75–$200. Add a few dollars for tape and washers.
- Time — Most DIY replacements take 20–40 minutes. Complex valve work or hidden leaks can take much longer.
- When to call a pro — If the leak is inside the wall, if piping is corroded, or if you need to change the valve or rough-in plumbing, hire a licensed plumber. Also call a pro if you lack tools or confidence with threads and seals.
Doing how to replace shower head and hose yourself saves money most of the time, but don’t hesitate to call help for plumbing behind walls or if the shower valve needs replacement.

Frequently Asked Questions of how to replace shower head and hose
Can I replace a shower head and hose without shutting off the main water?
You can often work with the shower valve off if it isolates the line. If you’re not sure the valve isolates the line fully, shut off the main to avoid leaks.
Do I need plumber’s tape when I replace a shower head and hose?
Yes. Plumber’s (Teflon) tape helps make a watertight seal on threaded connections and prevents leaks at the threads.
How long does it take to replace a shower head and hose?
Most swaps take 20–40 minutes for a straightforward replacement. Complications like corroded fittings or hidden leaks add time.
Why is my new shower head leaking after installation?
Common reasons are missing or misaligned washers, insufficient tape, or cross-threaded fittings. Turn off the water, recheck connections, and reapply tape if needed.
Are all hoses and shower heads universal?
Many are, but not all. Most use a standard 1/2-inch thread, but check your fittings and the product specs before buying.
Can I remove a flow restrictor to increase pressure?
You can remove some flow restrictors, but check local regulations and manufacturer guidance because it can increase water use and may void warranties.
What if the threads are damaged?
If threads are badly damaged, the fitting or shower arm should be replaced. Small damage sometimes cleans up with a brush and new tape, but large damage needs part replacement.
Conclusion
Replacing a shower head and hose is a quick, budget-friendly upgrade that boosts comfort and fixes leaks. Follow the step-by-step guide, pick the right parts, and use simple tools to finish the job in under an hour. If you run into hidden leaks or corroded fittings, call a licensed plumber to avoid bigger problems.
Ready to try it? Gather your tools, pick a compatible head and hose, and take the first step — then share your result or questions in the comments below.