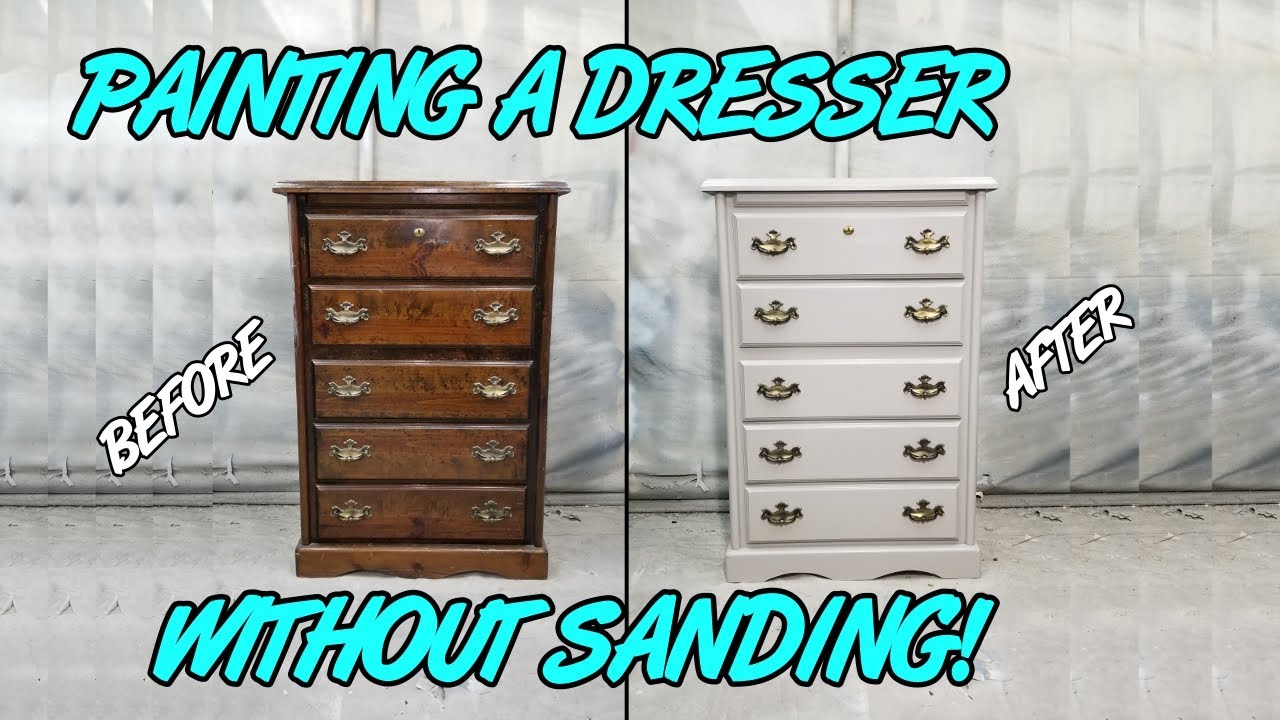
Strip, sand, prime, then paint your chest of drawers for a fresh, long-lasting update.
I’ve painted dozens of pieces and will walk you through how to paint a chest of drawers step by step. This guide blends practical tips, tools, and real-world lessons so you can transform a tired dresser into a room focal point without drama or wasted paint. Read on to learn how to paint a chest of drawers with confidence, whether you’re a beginner or a seasoned DIYer.
Why paint a chest of drawers?
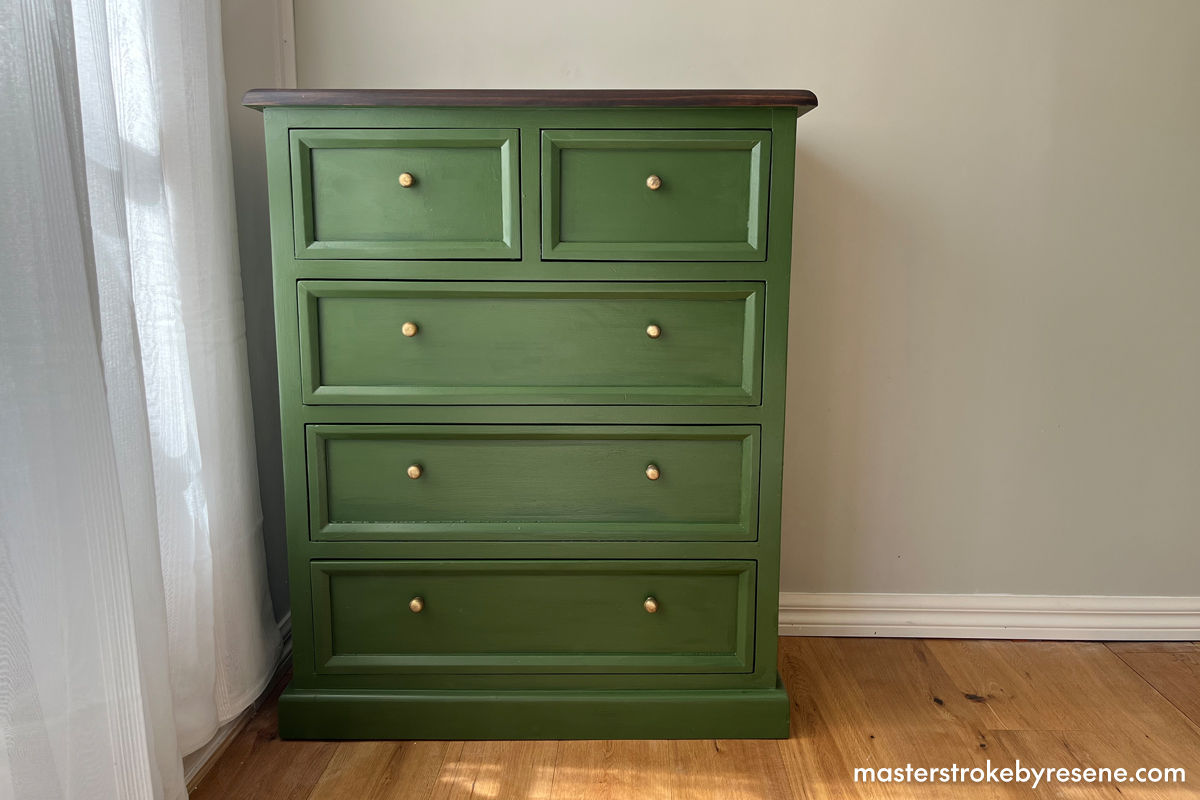
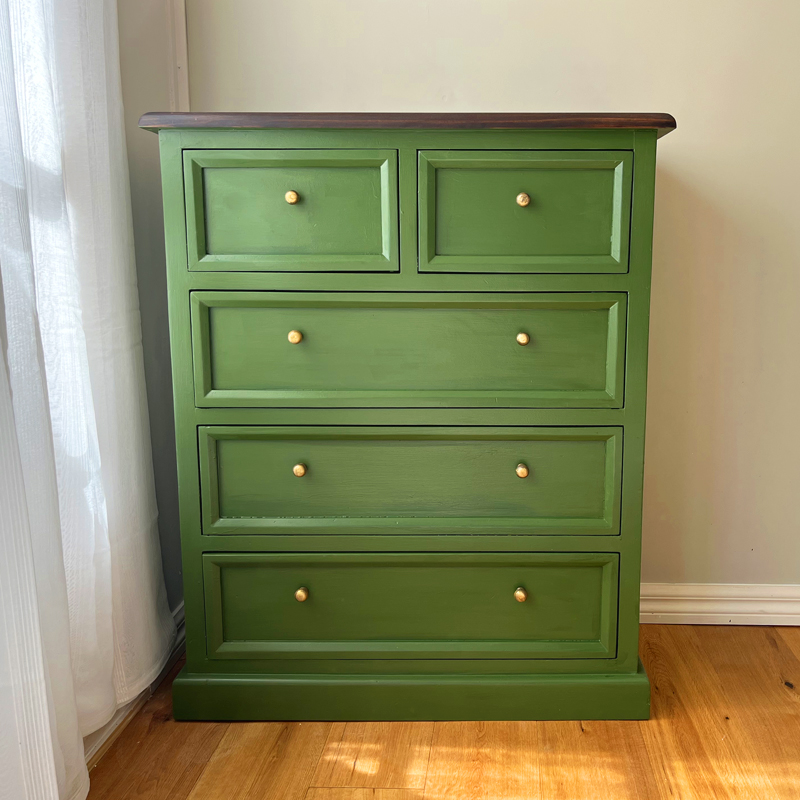
Painting a chest of drawers refreshes a room affordably and fast. It lets you match decor, hide wear, or give vintage pieces modern flair. Knowing how to paint a chest of drawers helps you avoid common mistakes and get a durable, attractive finish every time.

Materials and tools you’ll need for how to paint a chest of drawers
Gathering the right supplies sets you up for success. Here’s a clear list to prepare before you start how to paint a chest of drawers.
- Paint: Choose a durable furniture paint or acrylic latex paint designed for wood.
- Primer: Use a stain-blocking primer or bonding primer for slick surfaces.
- Sandpaper: 80-120 grit for rough work and 220 grit for finish sanding.
- Orbital sander or sanding block: Speeds sanding on large surfaces.
- Paintbrushes: One angled brush for detail and one flat brush for edges.
- Foam roller or mini roller: For smooth, even coverage on drawer faces and sides.
- Tack cloth or microfiber cloths: Remove dust between steps.
- Chemical stripper (optional): For heavy finishes or many layers of old paint.
- Painter’s tape and drop cloths: Protect hardware and floors.
- Screwdriver: Remove hardware and take drawers out.
- Clear topcoat: Water-based poly or furniture wax for protection.
- Respirator and gloves: For safety with strong primers or strippers.
Having these tools makes the process smoother and helps you learn how to paint a chest of drawers well.
Prep steps: how to paint a chest of drawers the right way
Good prep is 70% of a good finish. Follow these steps to prep properly for how to paint a chest of drawers.
- Remove hardware and drawers.
- Take off knobs, handles, and drawer bottoms if possible.
- Store screws in labeled bags so reassembly is easy.
- Clean the piece.
- Wipe surfaces with mild detergent and warm water.
- For greasy residue, use a degreaser made for wood.
- Strip old finish if needed.
- If the old paint peels or is thick, apply a chemical stripper or use a heat gun carefully.
- Remove residue completely before sanding.
- Sand the surface.
- Start with 80–120 grit to level rough spots.
- Finish with 220 grit for a smooth feel.
- Sand with the grain and avoid over-sanding veneer edges.
- Fill dents and holes.
- Use wood filler on deep gouges and sand smooth after drying.
- Clean dust.
- Wipe with a tack cloth and vacuum to remove all dust.
- Apply primer.
- Use a bonding or stain-blocking primer, especially on knotty or dark wood.
- Lightly sand primer with 220 grit after it dries for a better topcoat bond.
These prep steps set the stage for a flawless topcoat and show you how to paint a chest of drawers so it looks and lasts.

Painting and finishing: step-by-step for how to paint a chest of drawers
Now for the fun part. Use simple techniques to get a smooth, professional result when you paint a chest of drawers.
- Choose your finish and color.
- Satin and semi-gloss are durable and easy to wipe clean.
- Chalk paint gives a matte look and often skips primer, but still needs sealing.
- First coat—thin and smooth.
- Use a quality brush for corners and a mini foam roller for flat surfaces.
- Apply thin coats to avoid drips and brush marks.
- Sand between coats.
- Lightly sand with 220 grit once the coat dries.
- Wipe away dust and apply the next coat.
- Apply 2 to 3 coats.
- Most projects need at least two full coats for even color.
- Allow proper dry time as directed on paint can.
- Detail work.
- Reattach hardware or replace it for an updated look.
- Paint inside drawer edges for a finished appearance.
- Seal the paint.
- Use a clear water-based polyurethane for durability or wax for a softer finish.
- Apply at least one topcoat and follow dry times.
Following these steps will teach you how to paint a chest of drawers that looks shop-made. Thin coats and sanding between layers are small efforts that add big payoff.
/SPR-how-to-paint-a-dresser-4628146-hero-before-after-6c8b5796f6bc4a2189a8aef89492d75a.jpg)
Tips, common mistakes, and troubleshooting when you learn how to paint a chest of drawers
I’ve made some of these mistakes myself. Here’s what to watch for and how to fix problems when you paint a chest of drawers.
- Common mistake: Painting over grease or dust.
- Fix: Clean well and use a degreaser before sanding and priming.
- Common mistake: Heavy first coat that runs.
- Fix: Sand smooth, thin your paint slightly, and apply multiple thin coats.
- Tip: Remove hardware and label everything.
- It saves frustration and speeds up reassembly.
- Tip: Test color on a hidden spot first.
- Colors read differently on wood and dry surfaces than in the can.
- Troubleshooting: Peeling paint after a while.
- Cause: Poor adhesion from skipping primer or painting over glossy surfaces.
- Fix: Strip glossy areas or scuff sand, then prime with a bonding primer.
- Tip: Use a mini foam roller for fast, smooth drawer fronts.
- It cuts down brush marks and gives a factory-like finish.
- Personal lesson: I once used dark stain under pale paint; the bleed-through needed extra primer.
- Use stain-blocking primer on tannin-rich woods like oak or cedar to avoid bleed-through.
- Safety tip: Work in a ventilated area and wear a respirator when stripping or using oil-based products.
These tips reflect hands-on experience and will make the process of how to paint a chest of drawers easier and less stressful.
Frequently Asked Questions of how to paint a chest of drawers
How long does it take to paint a chest of drawers?
Expect 1 to 3 days total. Prep, drying times, and number of coats determine the schedule.
Do I need to strip old paint before painting?
You only need to strip when paint is flaking or there are many thick layers. Otherwise, clean and sand to scuff the surface.
What type of paint is best for a chest of drawers?
Acrylic latex or furniture-specific paints are best for durability and easy cleanup. Chalk paint is fine too but needs sealing.
Can I paint over veneer?
Yes, if you sand carefully and use a good bonding primer to prevent peeling. Be gentle around veneer edges to avoid damage.
How do I paint drawer fronts without drips?
Use thin coats, a mini roller for flats, and hang fronts to dry or place them on sawhorses for even coverage.
Should I seal painted drawers?
Yes, use a clear topcoat like water-based polyurethane or wax to protect the paint from wear and stains.
Can I use spray paint to paint a chest of drawers?
Spray paint works well for smooth, even coverage, but needs good ventilation and patience to build thin coats.
How do I choose the right finish sheen?
Choose satin or semi-gloss for durability and easy cleaning. Matte shows wear faster, while gloss highlights brush marks.
Is it worth refinishing vintage furniture?
Often yes. Refinishing preserves character and value, and learning how to paint a chest of drawers can modernize a treasured piece.
What if paint shows brush marks after drying?
Lightly sand with 220 grit and apply another thin coat using a foam roller or quality brush for a smoother finish.
Conclusion
You now have a clear, practical plan for how to paint a chest of drawers, from prep to finish. Start with good prep, choose the right paint and primer, apply thin coats, and seal for protection. Take one drawer at a time and learn as you go—small steps lead to a great result. Try a test piece today, and share your before-and-after; I’d love to hear how your chest of drawers turned out.