Turn your classic wired chime into a smart doorbell with local control using Home Assistant.
You want a simple, private, and reliable upgrade. This guide shows you How to Turn Your Wired Doorbell Using Home Assistant with clear steps, safe wiring tips, and real automations. I have built this for my own home and helped others do the same. You will learn what works, what breaks, and how to make it stick.

What you will build
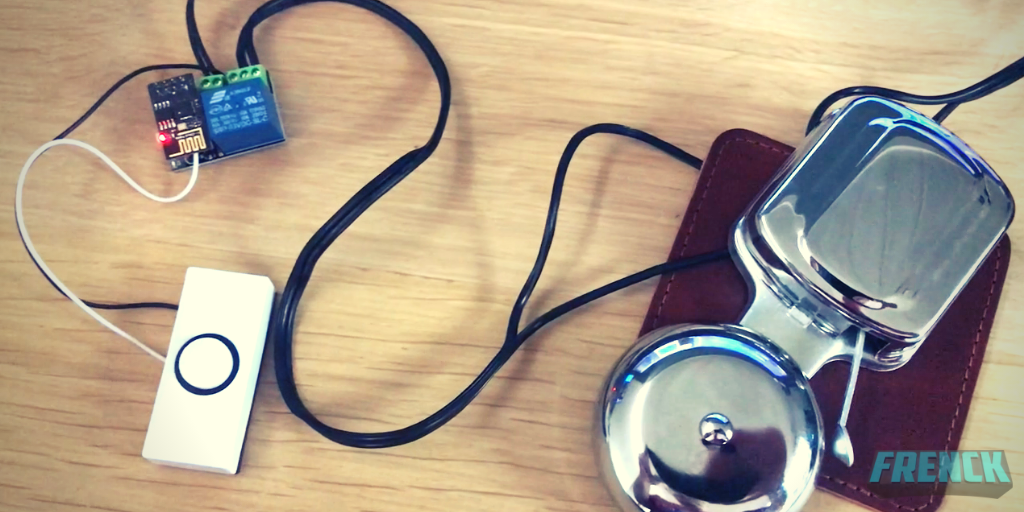
You will keep your existing transformer, button, and chime. You will add a small sensor and a smart switch so Home Assistant can detect a press and trigger actions. It will still ring your old chime. It will also send alerts, turn on lights, and log events. This is a local setup. It works even if the internet drops. It is exactly How to Turn Your Wired Doorbell Using Home Assistant for a practical home.

Parts and tools you need
You can do this with off‑the‑shelf parts or DIY boards. Pick one path that fits your skills and space.
Parts
- Low‑voltage transformer already in place. Most are 12–24 VAC, 10–30 VA.
- Your existing chime and doorbell button.
- One of these smart options:
- Small smart relay with dry contact inputs. Examples include low‑voltage relays with add‑ons or dedicated dry‑contact modules.
- ESP32 or ESP8266 running ESPHome to sense the press and control a relay.
- For ESPHome builds:
- 5V power supply or buck converter from the low‑voltage side.
- Optocoupler or small AC sensor to read the chime or button line.
- Relay module to simulate a button press.
- Wire, ferrules, and small junction box if needed.
- Multimeter, screwdriver, wire strippers, and tape labels.
Tips from experience
- Check transformer output with a meter. Mark the wires before you disconnect.
- Use a dry contact relay. Do not put DC into an AC chime.
- Keep modules in a ventilated box. Heat kills electronics fast.
This setup is a simple path for How to Turn Your Wired Doorbell Using Home Assistant that anyone can follow.

How your wired doorbell works
Most wired chimes use a low‑voltage AC transformer. The button connects the transformer to the chime. When you press the button, AC flows and the chime rings. There are two common layouts. The button is either between the transformer and chime or in a loop with two chime solenoids.
Why this matters
- You can sense the press by reading AC on the chime or button wire.
- You can also add a relay in parallel with the button to create a virtual press.
- Do not touch the high‑voltage side of the transformer. Turn off power before you start.
Knowing this is key to How to Turn Your Wired Doorbell Using Home Assistant without breaking the chime.

Choose your integration path
Each path keeps the old ring and adds smart logic. Pick one.
Option A: Non‑invasive sensing only
- What it is: Use an optocoupler or AC sensor to detect when the chime line goes live.
- Pros: Leaves all wires as is. Very safe and simple.
- Cons: You cannot trigger the chime from Home Assistant.
Option B: Sense the button and add a relay in parallel
– What it is: Read the button line with an optocoupler. Add a relay across the button.
- Pros: Detect presses and make Home Assistant “press” the doorbell.
- Cons: Needs careful wiring so you do not back‑feed DC into AC.
Option C: Drop‑in smart relay module with dry contact
- What it is: Use a ready module that senses input and offers a dry relay.
- Pros: Fast install, small size, built‑in Home Assistant support.
- Cons: Check voltage limits. Some need DC power from a separate supply.
Any of these paths support How to Turn Your Wired Doorbell Using Home Assistant in a clean, local way.

Wiring steps
Turn off the breaker to the transformer first. Label wires as you go. Take a photo.
Steps for Option B (ESPHome or similar)
- Power. Feed your ESP board with a safe 5V supply. You can use a small buck converter from the low‑voltage AC if you know what you are doing, or a separate wall adapter.
- Sense. Connect the optocoupler input to the chime or button line through a resistor and AC bridge if needed. Output goes to a GPIO pin as a binary sensor.
- Relay. Wire a dry relay across the doorbell button terminals. This simulates a press when closed.
- Test with a meter. Ensure the relay does not feed DC into the chime coil. The relay must only short the two button screws.
- Restore power. Press the button. The chime should ring as before.
- Watch Home Assistant logs. You should see the binary sensor change on a press.
- Trigger the relay from Home Assistant. The chime should ring.
Steps for Option C (smart relay module)
- Power the module per its manual. Some take DC only, so use a small DC supply.
- Wire the module’s input across the button or chime line to detect a press.
- Connect the module’s dry relay across the doorbell button terminals.
- Add the device to your network and to Home Assistant.
- Test a real press and then a virtual press from the app.
With both paths, you now have the core of How to Turn Your Wired Doorbell Using Home Assistant set up and working.

Configure Home Assistant
Add the device
- For ESPHome: Add the device from the ESPHome dashboard. Flash over USB or OTA. It will appear in Home Assistant as a new device.
- For smart modules: Use the native integration or MQTT. Follow the pairing guide.
Create entities
- Binary sensor for doorbell press. Name it sensor.doorbell_pressed.
- Switch or button entity for the relay. Name it switch.doorbell_relay.
- Optional helper: Counter for daily rings.
Example ESPHome YAML
binary_sensor:
  - platform: gpio
    pin:
      number: GPIO14
      mode: INPUT_PULLUP
    name: "Doorbell Pressed"
    filters:
      - delayed_on: 20ms
      - delayed_off: 100ms

switch:
  - platform: gpio
    pin: GPIO12
    name: "Doorbell Relay"
    id: doorbell_relay
    interlock: false

button:
  - platform: template
    name: "Ring Doorbell"
    on_press:
      - switch.turn_on: doorbell_relay
      - delay: 200ms
      - switch.turn_off: doorbell_relay
Automations in Home Assistant
- Trigger on sensor.doorbell_pressed going to on.
- Send a mobile push with a snapshot if a camera is present.
- Turn on porch lights after sunset for 5 minutes.
This is the software side of How to Turn Your Wired Doorbell Using Home Assistant. It is simple and fast.
Smart automations that shine
Ideas you can use today
- Doorbell alert with camera snapshot to your phone and watch.
- Text‑to‑speech on speakers that says “Someone is at the door.”
- Turn on porch and hall lights after dark for five minutes.
- Do not disturb window during naps. Log the ring but mute the chime relay.
- Auto‑open a smart gate for trusted guests with a secret double press.
These are the fun wins in How to Turn Your Wired Doorbell Using Home Assistant that make daily life easier.
Testing, troubleshooting, and common mistakes
Common issues and fixes
- Chime hums after install. Your relay or sensor may be leaking DC. Use a true dry contact relay and isolate your sensor with an optocoupler and bridge rectifier.
- False triggers. Add debounce in ESPHome. Increase delayed_on to 50–100 ms. Twist wires and keep signal wires short.
- Chime does not ring on virtual press. Make sure the relay is wired across the button, not in series. Raise relay pulse to 300–500 ms for long mechanical chimes.
- Transformer overload after adding a camera. Check VA rating. Many cameras need 8–10 VA. Upgrade to 16–24 VAC, 30 VA.
- Wi‑Fi drops. Place the module away from metal chime housings. Use a small external antenna if supported.
Run through these checks and you will nail How to Turn Your Wired Doorbell Using Home Assistant without headaches.

Safety, privacy, and reliability
Safety
- Power off at the breaker before any wiring.
- Work only on the low‑voltage side. Leave mains work to a pro.
- Use enclosures and strain reliefs. Label wires.
Privacy and trust
- This runs local. No cloud needed. Your audio and video, if used, stay in your home.
- Use strong Wi‑Fi passwords and device names that make sense.
- Keep Home Assistant and firmware up to date.
Reliability
- Add a small UPS to your router and Home Assistant. Your doorbell stays smart in an outage.
- Use quality power supplies. Bad power causes random resets.
These steps make How to Turn Your Wired Doorbell Using Home Assistant safe, private, and solid.
Cost and time
Typical costs
- ESPHome build with parts: 20–45 USD.
- Smart relay module path: 15–40 USD.
- New transformer if needed: 20–35 USD.
Time
- Planning and parts: 1 hour.
- Wiring and testing: 45–90 minutes.
- Home Assistant setup and automations: 30 minutes.
This is a small project with big payoff. It is a fast win for How to Turn Your Wired Doorbell Using Home Assistant.
Real‑world tips from installs
What I learned the hard way
- Keep the relay pulse short. Long pulses can jam a two‑tone chime.
- If the chime is very old, add felt pads under the cover. It cuts buzz and echoes.
- Use a spare input to detect long presses for secret actions.
- Document your wiring with a photo and a note inside the chime box.
- Test with your router off to confirm local control still alerts you.
These small tricks raise the success rate for How to Turn Your Wired Doorbell Using Home Assistant in real homes.
Frequently Asked Questions of How to Turn Your Wired Doorbell Using Home Assistant
Does this work with any wired doorbell?
Most wired chimes use 12–24 VAC, so yes in most cases. Very old or DC chimes may need a different sensor or a new transformer.
Can I keep my existing mechanical chime?
Yes. Wire the relay across the button so the chime still rings as usual. Your smart system just listens and can also “press” the button.
Do I need the internet for this to work?
No. Everything can run local in Home Assistant. Internet is only needed for remote alerts when you are away.
Is this safe to install by myself?
You work on low voltage, which is safer, but still take care. Turn off power, use proper enclosures, and call a pro if you are not sure.
Can I add a camera or video doorbell later?
Yes. Many people add a camera and keep the old chime. Make sure the transformer can supply enough VA for both.
Will this drain power or damage the transformer?
A sensor and relay draw very little. Check the VA rating and keep total load under its limit to avoid heat.
How do I stop pets or kids from waking naps?
Use a time window to mute the chime relay but still log the press. Send a silent push or blink a light instead.
Conclusion
You now have a clear plan to upgrade a classic chime into a smart, local system. You learned the parts, the wiring, the setup, and the best automations. You also saw the common mistakes and how to avoid them. This is the heart of How to Turn Your Wired Doorbell Using Home Assistant done right.
Start with a simple sensing path, then add a relay for virtual presses. Test, tune, and ship it. When you are ready, share your build and the automations that help your home. If this guide helped, subscribe for more tutorials, leave a comment with your setup, and tell me how you used How to Turn Your Wired Doorbell Using Home Assistant in your home.