Are you staring at that wall-mounted mirror and wondering how to take it down without damaging your walls or breaking the glass? Removing a mirror might seem tricky, but with the right steps, you can do it safely and smoothly.
In this guide, you’ll discover simple techniques to remove your wall-mounted mirror quickly, protect your space, and avoid common mistakes. Keep reading, and you’ll feel confident handling this task like a pro.
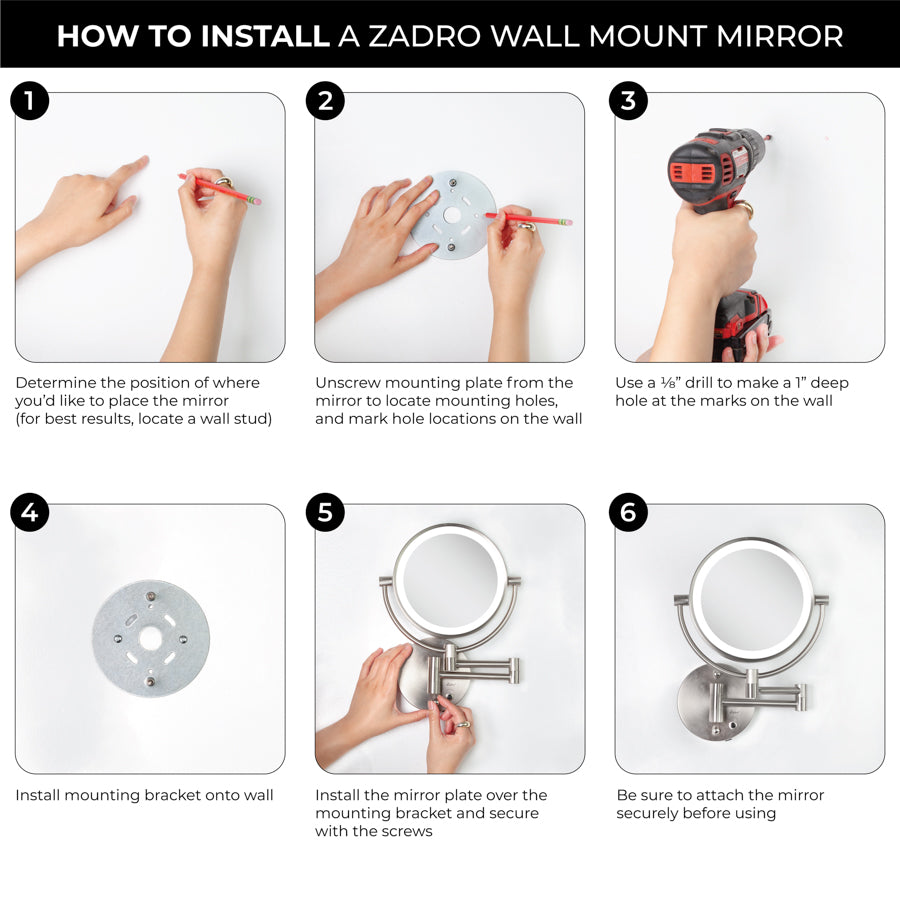
Credit: zadroinc.com
Tools Needed
Removing a wall-mounted mirror requires some specific tools. Having the right tools makes the job easier and safer. Prepare these tools before you start to avoid interruptions.
Basic Tools
You need a few basic tools to remove the mirror safely. A flat-head screwdriver helps to pry off clips or frames. A putty knife can slide between the mirror and the wall. Use a utility knife to cut through any sealant or paint. A pair of pliers helps to remove nails or screws. Keep a step ladder nearby if the mirror is high on the wall. These tools handle most parts of mirror removal.
Safety Gear
Safety gear protects you from injuries during the removal. Wear thick gloves to stop cuts from broken glass or sharp edges. Safety goggles protect your eyes from dust and glass shards. A dust mask helps if the wall or mirror frame creates dust. Long sleeves and pants protect your skin from scratches. Use proper footwear to avoid slipping or stepping on debris. Safety gear keeps you safe throughout the process.

Credit: www.youtube.com
Prepare The Area
Preparing the area is an important first step before removing a wall-mounted mirror. It helps keep the space safe and clean. Taking some time to prepare can prevent damage to your walls and floors. It also makes the whole process easier and faster.
Clear The Surroundings
Remove all items near the mirror. Move furniture away to create space. This prevents accidents and gives you room to work. Clear shelves, tables, and counters around the mirror. Keep pets and children out of the area. A clear space helps you focus and avoid damage.
Protect The Floor And Walls
Place a soft cloth or drop cloth on the floor. This protects it from falling glass or tools. Cover nearby walls with painter’s tape or cardboard. It stops scratches and dents during removal. Use painter’s tape to mark the mirror’s edges. This helps spot cracks or loose parts early.
Inspect The Mounting
Before removing a wall-mounted mirror, inspect the mounting carefully. This step helps avoid damage to the wall and mirror. Knowing how the mirror is attached guides the removal process. Take your time to understand the mounting type and what holds the mirror in place.
Identify Mounting Type
Start by looking closely at the mirror’s edges and back. Some mirrors hang on hooks or brackets. Others use clips or a frame that holds them tightly. Spotting the type helps you choose the right tools. It also shows how much force you can safely use. Mirrors with heavy brackets need extra care. Light clips or hooks are easier to handle. Check if the mirror rests on a ledge or floats on the wall.
Check For Adhesives Or Screws
Look for screws around the mirror’s frame or mounting points. Use a flashlight to see small screws or nails better. Some mirrors stick to the wall with glue or double-sided tape. Gently press near the edges to feel if the mirror is glued. Screws mean you need a screwdriver or drill. Adhesives require careful prying. Avoid pulling too hard to prevent cracks or wall damage. Knowing this saves time and protects your mirror.

Credit: dwellect.com
Remove The Mirror
Removing a wall-mounted mirror needs care and attention. This step helps avoid damage to walls or the mirror itself. Follow these simple steps to remove the mirror safely and cleanly.
Detach Screws Or Brackets
Start by locating the screws or brackets holding the mirror. Use a screwdriver to loosen each screw carefully. Keep the screws in a safe place for reuse. If the mirror uses brackets, gently lift or slide the mirror free. Avoid forcing the mirror to prevent cracks or breaks.
Handle Adhesive Removal
Some mirrors stick to the wall with adhesive. Use a putty knife or plastic scraper to loosen the glue. Work slowly and gently under the mirror’s edges. Warm the adhesive with a hairdryer to soften it. This makes removal easier and reduces wall damage.
Lift The Mirror Safely
Always lift the mirror with two hands. Hold the mirror near the bottom and sides for balance. Move slowly and keep the mirror close to the wall. Set the mirror down on a soft surface to avoid scratches. If the mirror is large, ask for help to lift it.
Prevent Wall Damage
Removing a wall-mounted mirror without damaging the wall takes care and the right approach. Walls can crack, chip, or leave ugly marks if you rush or use the wrong tools. Protect your wall by following simple steps. This keeps the surface smooth and ready for new decorations or paint.
Use Proper Tools
Choose tools that fit the job. A putty knife or a flat pry bar works well to loosen mirror edges. Use a utility knife to cut any caulk or adhesive around the mirror. Avoid metal tools that dig deep into the wall. Soft plastic or wooden tools help prevent scratches and dents.
Work Slowly And Carefully
Take your time to remove the mirror. Gently push and pull to loosen it from the wall. Quick force can pull off paint or drywall. Small, steady movements reduce pressure on the wall. Stop if the mirror resists. Check for hidden screws or clips. Patience saves your wall from damage.
Clean Up After Removal
Cleaning up after removing a wall-mounted mirror is important. It keeps your wall neat and ready for the next step. Leftover glue, dirt, or small holes can spoil the look of your wall. Proper cleanup helps your room look fresh and tidy again.
Remove Residue
Sticky glue or tape often stays on the wall after mirror removal. Use a soft cloth with warm, soapy water to wipe the area gently. For tougher glue, try rubbing alcohol or a commercial adhesive remover. Test any cleaner on a small spot first to avoid damage. Wipe the wall dry with a clean cloth afterward.
Repair Minor Wall Marks
Small holes or scratches may appear after the mirror is gone. Fill these with spackling paste or wall filler using a putty knife. Smooth the surface and let it dry completely. Lightly sand the area with fine sandpaper to blend it with the wall. Finally, paint over the repair to match the wall color.
Frequently Asked Questions
How Do I Safely Remove A Wall-mounted Mirror?
To safely remove a wall-mounted mirror, first protect the mirror with tape. Gently loosen the mounting brackets or adhesive. Use a helper to hold the mirror while detaching it from the wall. Always wear gloves to avoid injury from broken glass.
What Tools Are Needed To Remove A Wall Mirror?
You typically need a screwdriver, utility knife, putty knife, and gloves. A pry bar may help for stubborn adhesives. Having a helper is also useful to support the mirror during removal safely.
Can I Reuse The Mounting Hardware After Removal?
Yes, you can often reuse mounting hardware if it’s undamaged. Inspect screws, brackets, and anchors for wear or rust. Clean and tighten before reinstalling the mirror elsewhere to ensure secure mounting.
How To Remove Adhesive From Wall After Mirror Removal?
Use a utility knife or putty knife to gently scrape off adhesive residue. Apply adhesive remover or rubbing alcohol to soften stubborn glue. Wipe the area clean with a damp cloth before repainting or re-mounting.
Conclusion
Removing a wall-mounted mirror does not have to be hard. Take your time and follow each step carefully. Use the right tools to avoid damage to your wall. Keep safety in mind by wearing gloves and eye protection. Clean the wall after removing the mirror to prepare for new decor.
This simple process helps you change your space quickly and safely. Now, you can update your room with ease.