Are you tired of a weak shower stream that leaves you feeling less refreshed? The culprit might be the water restrictor inside your shower head.
Removing this tiny device can instantly boost your water flow, giving you a stronger, more satisfying shower experience. You’ll discover simple, step-by-step tips to safely remove the water restrictor from your shower head. Keep reading, and you’ll soon enjoy the powerful shower you deserve.
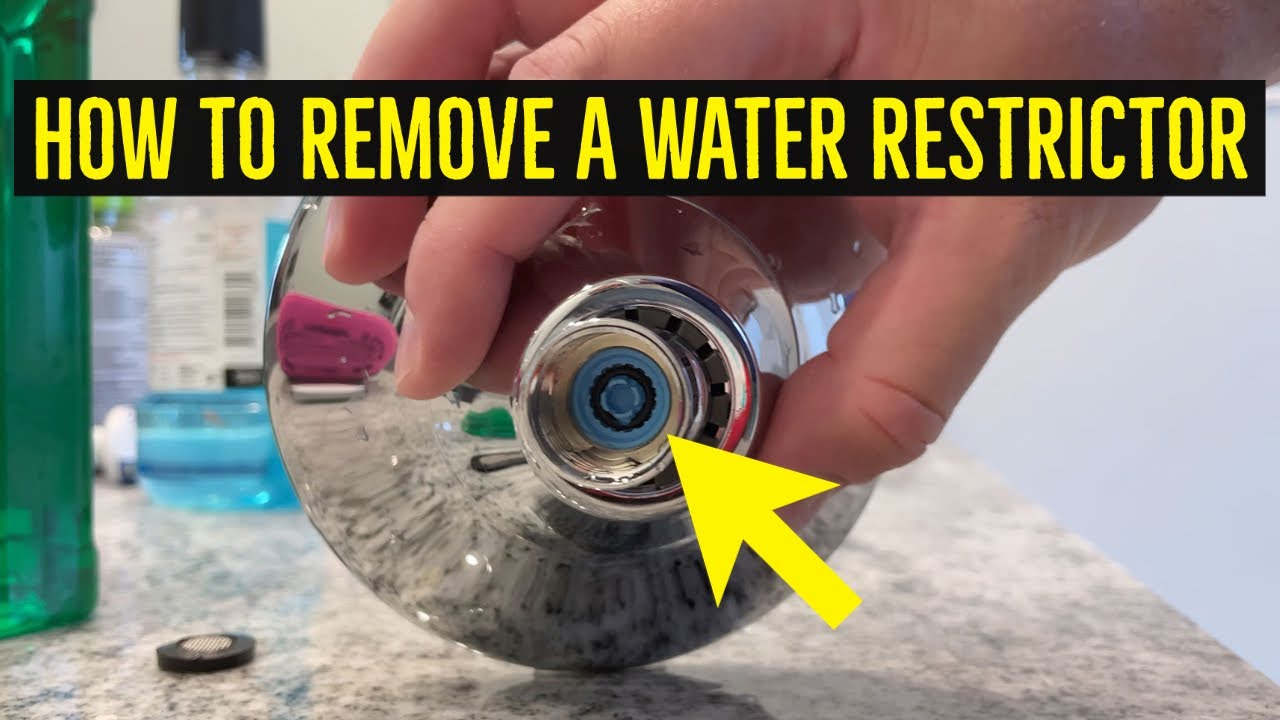
Credit: minda.by
Tools Needed
Removing a shower head water restrictor requires just a few simple tools. These tools help you access and take out the small part that limits water flow. Having the right tools makes the job easier and faster. Most of these tools are common and easy to find.
Prepare these tools before starting the removal process. Keep them close at hand for smooth work.
Adjustable Wrench
An adjustable wrench helps you loosen and remove the shower head. It fits different sizes of nuts and bolts. Use it carefully to avoid damaging the shower head.
Screwdriver
A flathead or Phillips screwdriver may be needed to remove screws on some shower heads. Choose the right type to avoid stripping the screw.
Needle-nose Pliers
Needle-nose pliers help grip small parts inside the shower head. They are perfect for pulling out the water restrictor gently.
Utility Knife
A utility knife can cut any seal or tape around the shower head. Use it carefully to avoid scratching the surface.
Cleaning Cloth
A soft cleaning cloth wipes away dirt and water after removal. It keeps the shower head clean and ready for reassembly.

Credit: diy.stackexchange.com
Identify The Restrictor
Identifying the water restrictor in your shower head is the first step to improve water flow. The restrictor limits water pressure to save water. Removing it can increase water output, but only after you know where it is.
Most restrictors are small plastic parts inside the shower head. They look like discs or washers. Sometimes, they have tiny holes or slots to control water flow.
Finding the restrictor requires removing the shower head from the pipe. This gives clear access to the internal parts. Once removed, you can spot the restrictor easily.
Locate The Shower Head
Turn off the water supply. Use a wrench or your hands to twist the shower head counterclockwise. Remove it carefully to avoid damage.
Examine The Inside
Look inside the opening of the shower head. You will see a small plastic part at the base. This is usually the restrictor.
Check For Different Types
Restrictors come in various shapes. Some are flat discs; others are small baskets. Identify the one inside your shower head before removing it.
Turn Off Water Supply
Turning off the water supply is the first step before removing the shower head water restrictor. This stops water from flowing while you work. It keeps the area dry and prevents leaks.
Stopping water flow also helps avoid accidents. It protects you and your bathroom from water damage. This step makes the whole process easier and safer.
Locate The Main Water Valve
Find the main water valve in your home. It is often near the water meter or where the pipe enters your house. Turning this valve off stops water to all fixtures, including the shower.
Use The Shower Valve
Some homes have a separate valve for the shower. Check under the sink or near the shower for a small shut-off valve. Turn it to close the water supply to the shower only.
Turn Off The Valve Properly
Use your hand or a wrench to turn the valve clockwise. Turn gently but firmly. Do not force it to avoid damage. The valve should stop water completely when closed.
Test The Water Flow
After turning off the valve, open the shower handle. Check if water still flows. No water means the supply is off, and it is safe to remove the restrictor.

Credit: www.reddit.com
Remove The Shower Head
Removing the shower head is the first step to take out the water restrictor. This process lets you access the inside parts easily. It also makes cleaning and repairs simpler. Follow these simple steps to safely remove your shower head.
Turn Off The Water Supply
Start by turning off the water supply to the shower. This stops water from flowing while you work. You can use the main water valve or the shower valve. Make sure no water sprays out during removal.
Protect The Shower Arm
Wrap a cloth around the shower arm to avoid scratches. Using a soft cloth prevents damage from tools. This step keeps your bathroom fixtures looking new.
Use A Wrench To Unscrew
Grip the shower head base with a wrench. Turn the wrench counterclockwise to loosen the head. Apply steady pressure but avoid forcing it. If tight, use some penetrating oil and wait a few minutes.
Once loose, unscrew the shower head by hand. Pull it gently away from the shower arm. Inspect the connection for any leftover tape or debris. Clean the threads before reattaching or replacing parts.
Locate And Extract The Restrictor
Removing the water restrictor from your shower head can boost water flow and improve your shower experience. The first step is to locate the restrictor inside the shower head. It is usually a small plastic or rubber piece that limits water flow. Once found, carefully extracting the restrictor is essential to avoid damage.
Using Pliers Or Tweezers
Use pliers or tweezers to grip the restrictor firmly. Grip gently to avoid breaking the piece or scratching the shower head. Slowly pull the restrictor straight out. If it feels stuck, wiggle it slightly to loosen. Avoid forcing the removal, as this can cause damage.
Handling Different Restrictor Types
Some restrictors are flat discs, while others are small cones or washers. Flat discs often sit flush inside the shower head opening. Cones or washers may be deeper inside. Identify the type to choose the best removal method. Some may require twisting before pulling out. Be patient and inspect the restrictor carefully for a smooth extraction.
Clean The Shower Head
Cleaning the shower head is a key step before removing the water restrictor. Dirt and mineral build-up can block water flow and make the shower weaker. A clean shower head helps you see the restrictor clearly. It also improves water pressure and extends the shower head’s life.
Cleaning is simple and only takes a few minutes. You can do it without special tools. This step prepares your shower head for the next task: removing the water restrictor.
Start by turning off the water supply. Use a wrench or pliers to loosen the shower head. Turn it counterclockwise until it comes off. Place a cloth around the connection to avoid scratches. Set the shower head aside on a soft surface.
Soak The Shower Head In Vinegar
Fill a bowl with white vinegar. Submerge the shower head in the vinegar. Let it soak for 30 minutes to one hour. Vinegar dissolves mineral deposits and grime. This makes cleaning easier and more effective.
Scrub The Nozzles And Surface
Use an old toothbrush or small brush. Gently scrub the nozzles to remove stubborn deposits. Clean the surface and small holes too. Rinse the shower head with warm water after scrubbing. Check that all dirt and residue are gone.
Dry And Inspect The Shower Head
Wipe the shower head with a clean cloth. Check inside the connection for any leftover debris. Make sure the water flow holes are clear. A clean shower head will help water flow better. Now it is ready for the next step in removing the restrictor.
Reassemble And Reinstall
After removing the water restrictor from your shower head, it is time to put everything back together. This step is important to avoid leaks and ensure your shower works well. Follow these simple instructions to reassemble and reinstall the shower head correctly.
Clean The Shower Head Parts
Before reassembling, clean all parts carefully. Use a soft cloth to remove any dirt or mineral buildup. This helps the parts fit tightly and prevents leaks.
Reassemble The Shower Head Components
Put the shower head parts back in order. Make sure the gasket or rubber washer is in place. Tighten the parts by hand to avoid damage. Check that everything fits snugly.
Apply Plumber’s Tape
Wrap plumber’s tape around the shower arm threads. This tape stops leaks and makes the connection tighter. Wrap it two or three times in a clockwise direction.
Reinstall The Shower Head
Screw the shower head onto the shower arm by hand. Turn it clockwise until it is tight. Use a wrench for a final turn, but do not over-tighten. This protects the shower head and pipes.
Test For Leaks And Proper Flow
Turn on the water and check for leaks. Watch the water flow from the shower head. Make sure it feels strong and steady. Tighten or adjust if needed.
Test Water Flow
Testing the water flow is a key step after removing the shower head water restrictor. It shows if the water pressure improves. It also helps spot leaks or issues early.
Checking water flow is simple. You only need to turn on the shower and watch closely. This step ensures the shower works well without the restrictor.
Turn On The Shower
Open the shower valve fully. Let the water run for a few seconds. Notice the strength of the water stream. A stronger flow means the restrictor is removed correctly.
Observe Water Pressure
Look at how hard the water hits the skin. Higher pressure feels more forceful and steady. Low pressure might mean the restrictor is still inside.
Check For Leaks
Look around the shower head connection. Water drops or sprays show leaks. Tighten the shower head if you see leaks. This prevents water waste and damage.
Compare With Previous Flow
Think about how the water felt before. The flow should be stronger now. This difference confirms the restrictor is gone.
Safety Tips
Removing a shower head water restrictor can improve water flow. Safety is very important during this task. Careful steps help avoid damage and injury. Follow the tips below to stay safe and protect your shower parts.
Use Proper Tools
Choose the right tools for the job. A small screwdriver or needle-nose pliers often work best. Avoid using tools that can slip or damage the shower head.
Stop water flow before starting. Turn off the main water valve or the shower valve. This prevents water from spraying and causing a mess.
Protect Your Hands
Wear gloves to avoid cuts and scrapes. Shower heads have small edges that can hurt your skin. Gloves also improve grip on slippery parts.
Work Slowly And Carefully
Take your time removing the restrictor. Rushing can break parts or cause injury. Handle all parts gently to keep them in good condition.
Check For Hidden Parts
Some restrictors are hidden deep inside. Look closely to avoid missing any small pieces. Removing all parts ensures better water flow and avoids leaks.
Frequently Asked Questions
What Is A Shower Head Water Restrictor?
A water restrictor limits water flow in shower heads to conserve water. It helps reduce water usage and energy bills. Removing it increases water pressure for a stronger shower experience.
How Do I Safely Remove A Shower Head Water Restrictor?
To remove it, first unscrew the shower head. Locate the restrictor inside the connector. Use pliers or a small screwdriver to carefully pry it out without damaging the shower head.
Will Removing The Water Restrictor Increase Water Pressure?
Yes, removing the restrictor boosts water flow and pressure. This results in a more powerful and satisfying shower. However, it may increase water and energy consumption.
Can Removing The Restrictor Cause Plumbing Issues?
Removing the restrictor usually does not harm plumbing. But excessive water pressure might stress pipes over time. Check local regulations before removing restrictors to ensure compliance.
Conclusion
Removing a shower head water restrictor can boost your water flow easily. Take your time and follow the steps carefully. Use simple tools and avoid forcing parts. This small change can improve your shower experience. Remember to check local rules about water use before you start.
Enjoy a stronger, more comfortable shower after the fix. Keep safety in mind and work patiently. You can do this yourself with a little effort and care.