Are you ready to give your space a bright, stylish upgrade? Installing a wall-mounted lighted mirror can instantly transform your room, adding both function and flair.
You might think it’s complicated, but with the right steps, you can do it yourself quickly and safely. In this guide, you’ll learn exactly how to install your lighted mirror so it looks amazing and works perfectly. Keep reading—you’re just a few easy steps away from a brighter, more beautiful space!

Credit: www.amazon.com
Choosing The Right Mirror
Choosing the right wall mounted lighted mirror is important for your space. It affects both function and style. The mirror should fit your room and suit your needs.
Think about size, style, lighting type, and power source. These factors help you pick the best mirror. Let’s explore each one for a clear choice.
Size And Style Considerations
Measure the wall space before buying a mirror. A mirror too big can crowd the room. Too small may not serve its purpose well.
Match the mirror style to your room decor. Simple, modern, or vintage designs work differently. Choose a style that blends well with your space.
Types Of Lighted Mirrors
Lighted mirrors come in many types. Some have LED lights around the edges. Others have built-in bulbs or backlit panels.
LED mirrors save energy and last longer. Backlit mirrors create soft, even light. Pick the type that fits your lighting needs.
Power Source Options
Lighted mirrors need power to work. Some plug into a wall outlet. Others connect directly to your home wiring.
Battery-operated mirrors offer flexibility but need regular battery changes. Hardwired mirrors are permanent and neat. Choose a power source that suits your space and convenience.
Tools And Materials Needed
Installing a wall-mounted lighted mirror requires the right tools and materials. Having everything ready makes the job easier and safer. This section lists what you need before starting.
Essential Tools List
- Drill with various drill bits for different wall types
- Screwdriver, preferably both flathead and Phillips
- Measuring tape to mark precise locations
- Level to ensure the mirror hangs straight
- Pencil for marking drill points
- Stud finder to locate wall studs
- Wall anchors or screws, depending on your wall type
- Wire stripper and electrical tape if wiring is needed
- Step ladder for reaching higher spots
Safety Equipment
- Safety goggles to protect your eyes from dust and debris
- Work gloves to protect your hands
- Dust mask to avoid inhaling particles
- Ear protection if you use loud power tools
- Non-slip shoes for stable footing
Preparing The Wall
Preparing the wall is the first step to install a wall mounted lighted mirror. This step ensures the mirror stays secure and looks great. Proper preparation avoids damage and makes installation easier. Follow these steps carefully for the best results.
Finding The Ideal Location
Choose a spot with enough space for the mirror size. The wall should be flat and clean. Check the height so the mirror suits daily use. Avoid placing the mirror where direct sunlight hits it. This prevents glare and damage over time.
Marking Mounting Points
Use a pencil and level to mark where the screws will go. Measure twice to make sure marks are even. These points must match the mirror’s mounting brackets. Accurate marks help the mirror hang straight and firm.
Checking For Wiring And Studs
Use a stud finder to locate studs behind the wall. Mounting on studs gives strong support. Scan the wall for electrical wiring to avoid drilling hazards. Avoid drilling into wires to keep safe and prevent damage.
Installing The Mounting Bracket
Installing the mounting bracket is the first step to hang your wall mounted lighted mirror safely. The bracket holds the mirror and keeps it steady on the wall. Proper installation prevents the mirror from falling and causing damage.
Measure carefully and mark where the bracket will go. Use a level to make sure it is straight. The bracket must be fixed firmly to support the mirror’s weight.
Attaching Brackets Securely
Use screws that fit the bracket holes perfectly. Drill pilot holes in the wall to guide the screws. This stops the wall from cracking.
Place the bracket against the wall and align it with the marks. Tighten the screws until the bracket feels solid. Give it a slight shake to check stability.
Using Anchors For Drywall
Drywall alone cannot hold heavy mirrors well. Use wall anchors to add strength. Choose anchors rated for the mirror’s weight.
Drill holes for the anchors at your marks. Push or tap the anchors into the holes gently. Screw the bracket screws into the anchors tightly.
Anchors spread the load inside the wall. This keeps the bracket secure and prevents damage to drywall.
Wiring The Lighted Mirror
Wiring the lighted mirror is a key step in the installation process. It powers the mirror’s lights and makes them work properly. Careful handling of wires ensures safety and lasting function. Follow simple steps to connect the mirror to your home’s electrical system safely and correctly.
Connecting To Power Supply
Start by turning off the main power to the room. Use a voltage tester to confirm no electricity flows. Identify the wires coming from the wall: usually black (live), white (neutral), and green or copper (ground).
Match the mirror’s wires with the wall wires by color. Twist the wires together and secure them with wire nuts. Make sure connections are tight to avoid sparks or loose wires. Wrap electrical tape around the wire nuts for extra safety.
Handling Electrical Safety
Always wear insulated gloves when working with electricity. Avoid touching bare wires or metal parts. Keep water and dampness away from the work area. Use a sturdy ladder to reach the mirror safely. Double-check that power is off before touching wires.
Follow local electrical codes and regulations. Consult a professional electrician if unsure or uncomfortable. Safety prevents accidents and protects your home from fire risks.
Testing The Lighting
Once wiring is complete, turn the main power back on. Use the mirror’s switch or button to turn on the lights. Look for steady, bright light without flickering or dim spots.
If the light does not turn on, recheck all wire connections. Tighten loose wires and replace any damaged parts. Proper testing ensures your mirror works perfectly every day.

Credit: bona-store.com
Mounting The Mirror
Mounting the mirror is the key step in installing your wall-mounted lighted mirror. It needs careful handling for safety and a perfect look. Follow these simple steps to set your mirror firmly on the wall.
Aligning And Securing The Mirror
Start by checking the wall anchors or screws. They must be strong enough to hold the mirror’s weight. Use a level to make sure the mounting brackets are straight. Hold the mirror close to the wall and align the hooks or holes. Gently hang the mirror on the brackets. Press the mirror lightly to secure it in place. Tighten any screws or fasteners to lock the mirror firmly. Avoid forcing the mirror; it should fit smoothly.
Final Adjustments
After mounting, stand back and check the mirror’s position. Adjust it slightly to ensure it is even and straight. Test the light switch to confirm the mirror lights work properly. Clean the mirror surface with a soft cloth to remove fingerprints or dust. Make sure the mirror feels stable and does not wobble. These small checks help keep your mirror safe and looking great.
Maintenance Tips
Maintaining a wall mounted lighted mirror keeps it looking fresh and working well. Regular care helps prevent damage and extends the mirror’s life. Simple steps make cleaning and replacing parts easy. Follow these tips to keep your mirror bright and clear.
Cleaning The Mirror And Lights
Use a soft cloth to wipe the mirror surface. Avoid abrasive materials that can scratch the glass. Spray a gentle glass cleaner on the cloth, not directly on the mirror. Wipe the lights carefully to remove dust and dirt. Clean the frame and edges to keep the mirror neat.
Replacing Bulbs Or Leds
Turn off the power before replacing any bulbs or LEDs. Check the type and size of the bulb needed. Gently remove the old bulb without forcing it. Insert the new bulb firmly but carefully. Test the lights to make sure they work properly.
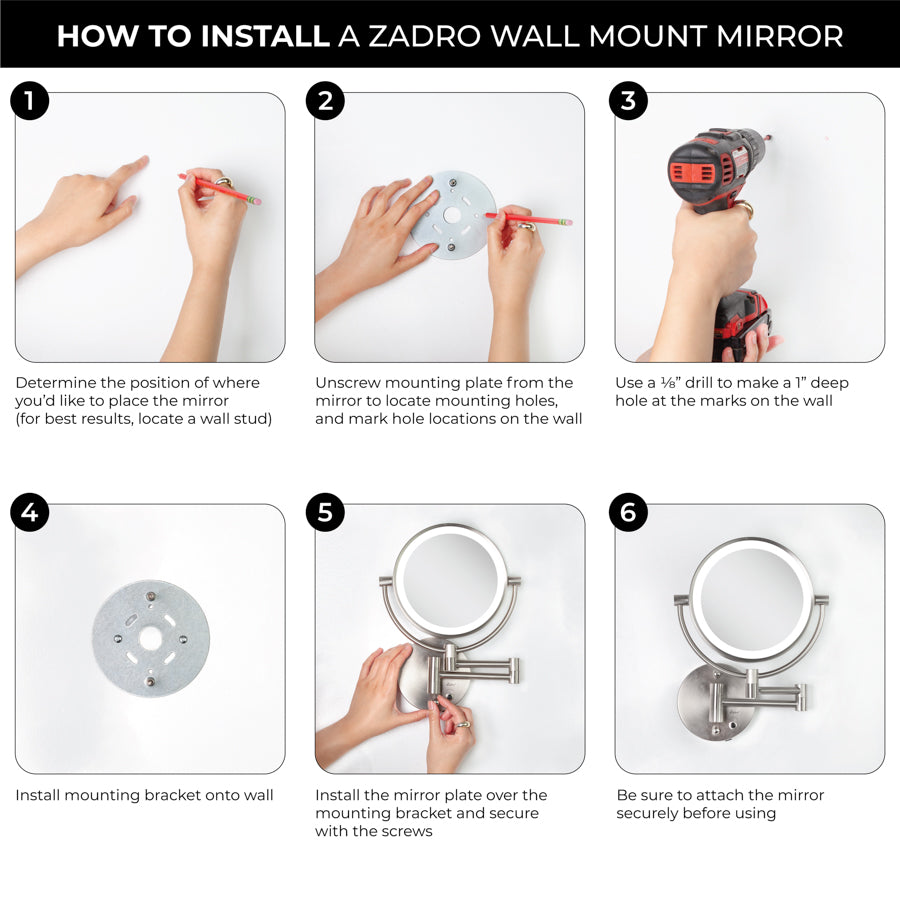
Credit: zadroinc.com
Frequently Asked Questions
How Do I Mount A Lighted Mirror On The Wall?
To mount a lighted mirror, locate wall studs, mark drill points, and use appropriate anchors. Secure the mirror with screws and ensure it’s level for stability and safety.
What Tools Are Needed To Install A Lighted Mirror?
You need a drill, screwdriver, level, measuring tape, pencil, wall anchors, and screws. These tools help ensure a secure and accurate installation.
Can I Install A Lighted Mirror Without Professional Help?
Yes, with basic DIY skills and proper tools, you can install it yourself. Follow instructions carefully and ensure electrical safety if the mirror has built-in lighting.
How Do I Connect The Electrical Wiring For The Mirror?
Turn off power before wiring. Connect the mirror’s wires to the corresponding house wires using wire nuts. Follow the manufacturer’s instructions and local electrical codes for safety.
Conclusion
Installing a wall mounted lighted mirror can improve your space’s look. Follow each step carefully to ensure a safe setup. Use the right tools and measure twice before drilling. Take your time to avoid mistakes and damage. A well-installed mirror adds both light and style to any room.
Enjoy the brighter, clearer reflection every day. Simple effort brings great results. Try this project to refresh your home easily.