Have you ever lit your favorite jar candle, only to find it burning unevenly with a deep tunnel down the middle? It’s frustrating to see all that wax wasted while your candle’s flame struggles to stay strong.
But don’t worry—fixing a tunneled candle is easier than you think. You’ll discover simple, effective steps to restore your candle’s even burn and make the most of every last drop. Keep reading, and you’ll never have to toss a tunneled candle again.
Causes Of Candle Tunneling
Candle tunneling happens when the wax burns down the center only. This leaves wax along the sides of the jar. It wastes wax and shortens the candle’s life. Understanding the causes helps fix and avoid tunneling. Several factors affect how a candle burns.
Wick Issues
The wick plays a big role in how the candle burns. A wick that is too small makes a weak flame. It cannot melt the wax evenly to the edges. This causes the wax to stay solid on the sides. On the other hand, a wick too large can burn too fast. This causes uneven wax melting and soot buildup. Keeping the wick trimmed helps the candle burn well.
Burning Time Mistakes
Candles need enough time to melt wax across the surface. Burning a candle too short causes only the center to melt. This makes a tunnel in the middle. It can take one to three hours for the wax to melt fully. Burning longer at first helps create a full wax pool. This avoids tunneling and helps the candle last longer.
Jar Size And Shape
The size and shape of the jar affect heat distribution. A deep and narrow jar traps heat in the center. This melts wax only near the wick. Wide jars spread heat better and melt wax more evenly. Odd shapes may cause air flow issues. This changes how the candle burns. Choosing the right jar size helps prevent tunneling.

Credit: www.youtube.com
Preparing Your Candle For Repair
Fixing a jar candle that has tunneled starts with good preparation. This step makes the repair easier and safer. Take time to get your candle ready before you begin any work. A prepared candle gives better results and saves effort.
Gathering Tools
Collect all tools needed before starting. You will need a lighter or matches, a heat gun or hair dryer, a toothpick or skewer, and a small knife. Have a bowl of warm water and a clean cloth nearby. These items help you reshape the wax and smooth the surface.
Safety Precautions
Work in a well-ventilated area to avoid smoke buildup. Keep flammable materials away from your workspace. Use heat tools carefully to prevent burns or accidents. Never leave a lit candle unattended. Make sure the candle is cool before handling it to avoid injury.
Simple Methods To Fix Tunneling
Tunneling happens when a jar candle burns down the middle, leaving wax on the sides. This wastes wax and shortens candle life. Fixing tunneling is easy with simple steps. These methods help the candle burn evenly again. Try these quick fixes to save your candle and enjoy its full scent and light.
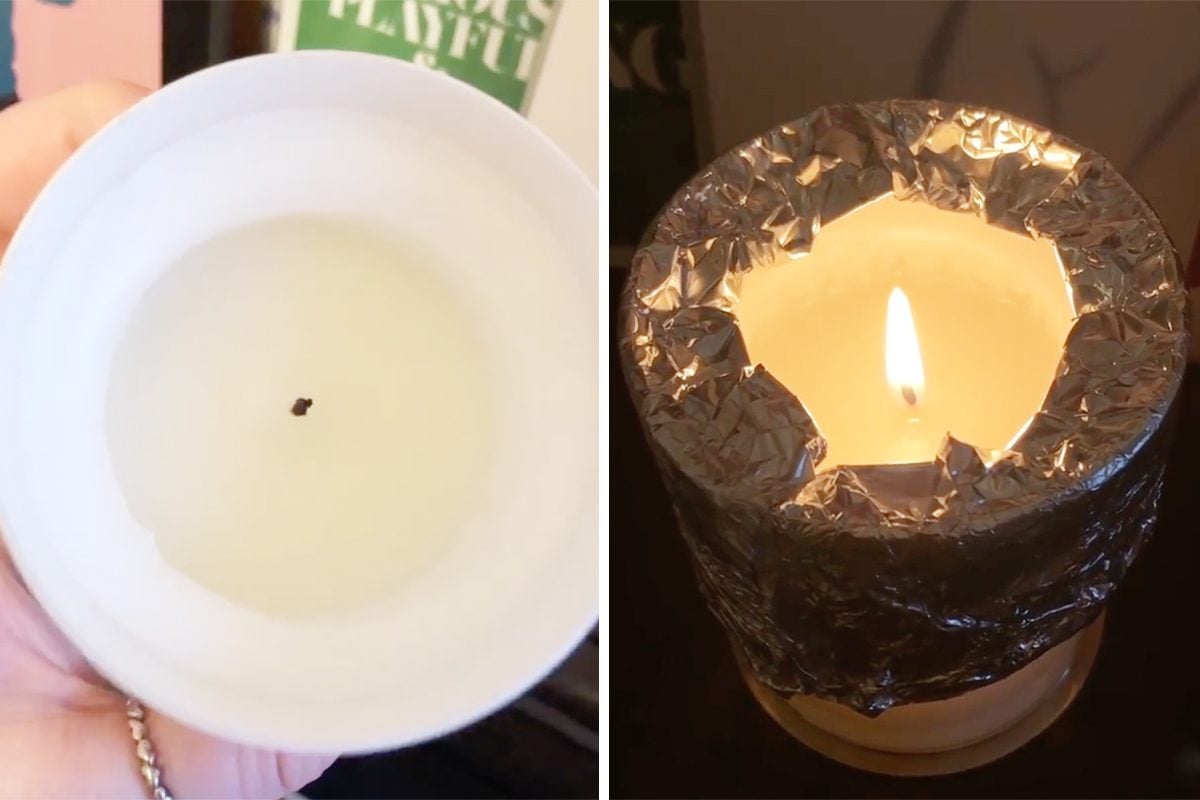
Use Foil To Even Out Wax
Take a piece of aluminum foil and wrap it around the top of the candle. Leave a small hole above the wick. The foil traps heat and melts the wax on the sides. Check after 15 minutes and adjust the foil if needed. This method helps the wax melt evenly and fills in the tunnel.
Re-melt The Wax Surface
Use a hairdryer on low heat to warm the candle’s top layer. Move the dryer slowly over the wax surface. The heat melts the uneven wax and smooths it out. Allow the wax to cool and harden before lighting again. This softens the tunnel edges and promotes even burning next time.
Trim And Center The Wick
Cut the wick to about 1/4 inch before lighting. A wick too long causes uneven burning and tunneling. Check if the wick is centered in the jar. Gently push it to the middle if needed. A centered wick helps heat spread evenly across the wax surface.
Preventing Future Tunneling
Preventing future tunneling in jar candles keeps your candle burning evenly. It helps the wax melt across the entire surface. This saves wax and makes the candle last longer. Simple habits can stop tunneling before it starts. Follow these easy tips to enjoy a perfect burn every time.
Proper Initial Burn Time
Burn your candle long enough the first time. Let the wax melt all the way to the jar edges. This can take one to two hours. Avoid burning for less time. A short burn causes the wax to tunnel. The first burn sets the pattern for all future burns.
Wick Maintenance Tips
Keep the wick trimmed to about 1/4 inch. A long wick creates a tall flame and uneven burning. Trim the wick before every burn. Remove any wick debris from the wax. Clean wicks help the candle burn cleanly and evenly.
Choosing The Right Candle
Select candles with quality wax and well-centered wicks. Cheap candles often tunnel due to poor materials. Look for candles designed to burn evenly. Size matters too. Larger jars need longer first burns. A good candle reduces the chance of tunneling problems.
When To Replace Your Candle
Knowing when to replace a jar candle is important. It saves time and money. It also keeps your space safe and smelling fresh. Some signs show that a candle has served its purpose. These signs help you decide if fixing is worth it or if replacement is best.
Signs Of A Burned-out Wick
A wick that is too short or buried in wax is hard to light. It may produce little or no flame. The candle then burns unevenly and can tunnel again. At this point, replacing the candle is a smart choice.
Excessive Wax Tunneling
Deep tunnels that reach the jar sides are hard to fix. Wax buildup around the edges wastes most of the candle. If tunneling is severe, the candle will burn poorly. This means it is time to get a new one.
Unpleasant Or Weak Scent
A candle that no longer smells good or has a faint scent loses its charm. The fragrance oils may be gone or damaged. Burning such a candle is less enjoyable. Replace it to keep your room smelling nice.
Cracked Or Damaged Jar
Cracks or chips in the jar pose a safety risk. Heat from the candle can cause the jar to break further. This can lead to spills or fire hazards. Replace the candle immediately for safety reasons.
Burn Time Exceeded
Most jar candles have a recommended burn time. Burning beyond this time reduces quality and safety. The candle may burn unevenly or produce soot. Stop using the candle after this time and replace it.
Credit: www.tasteofhome.com
Credit: www.reddit.com
Frequently Asked Questions
What Causes Jar Candles To Tunnel During Burning?
Jar candles tunnel when only the wick’s center melts. This happens if the candle burns too briefly or unevenly. Insufficient melting wastes wax and shortens candle life. Proper first burns and wick trimming help prevent tunneling.
How Can I Fix A Jar Candle That Has Tunneled?
To fix tunneling, melt the outer wax rim gently. Use aluminum foil around the jar to evenly heat the wax. This melts the edges, allowing the wax to pool and burn properly next time.
Can Trimming The Wick Prevent Candle Tunneling?
Yes, trimming the wick to about ¼ inch helps. It promotes even flame size and wax melting. A properly trimmed wick reduces soot and prevents uneven burning that leads to tunneling.
Is It Safe To Use Foil To Fix A Tunneled Candle?
Yes, using aluminum foil safely directs heat to melt wax edges. Wrap it around the jar’s top, leaving the center exposed. Monitor carefully to avoid overheating or glass damage.
Conclusion
Fixing a jar candle that has tunneled is simple with a little care. Use the right steps to melt the wax evenly. This helps the candle burn better and last longer. Keep your candle wick trimmed and burn the candle long enough each time.
Small actions make a big difference in candle performance. Enjoy your candle’s full glow and scent without waste. Try these tips and bring life back to your jar candle.