Change the cabin air filter by locating the filter housing, removing the old filter, and installing the new filter.
I’ve changed dozens of cabin filters and helped friends keep their cars smelling fresh and running efficient. This guide on how to change air conditioner filter in car walks you through why it matters, the tools you need, clear step-by-step instructions, and tips from real experience so you can do it fast and right.
Why changing the cabin filter matters and when to do it
A clean cabin filter keeps air fresh and protects your heating and cooling system. It also improves airflow and reduces dust, pollen, and odors inside the car. Knowing how to change air conditioner filter in car saves money and keeps your HVAC system healthy.
Signs you need a new filter:
- Reduced airflow from vents.
- Musty or stale smell when A/C or heat runs.
- Visible dust on vents or blown air.
- Allergy flare-ups while driving.
Typical replacement intervals:
- Every 12,000 to 15,000 miles for most cars.
- Or once a year if you drive less.
- More often if you drive in dusty areas or have pets.
From my experience, filters in city cars last longer than those in rural, dusty routes. If you park near trees or construction, check the filter every 6 months.

Tools and parts you'll need
This job is simple and needs few items. Gather these before you start.
Essential items:
- New cabin air filter that fits your car model.
- Flathead screwdriver or Phillips screwdriver (if needed).
- Gloves to keep hands clean.
- Flashlight to see in tight spaces.
- Small tray or towel to hold screws and clips.
Optional items:
- Vacuum cleaner with a narrow nozzle for the filter area.
- Compressed air to blow out debris (use gently).
- Mask if you’re sensitive to dust.
Picking the right filter matters. Look up your car by year, make, and model to get the correct size and type. I always check the owner’s manual to confirm which filter fits.

Step-by-step: how to change air conditioner filter in car
These steps use simple language and short actions. Pause if you need to check your car manual.
-
Prepare the car
- Park on level ground and turn the engine off.
- Set the parking brake and open the glove box or hood, depending on the car.
-
Locate the cabin filter
- Many cars hide the filter behind the glove box.
- Some place it under the hood near the windshield cowl.
- Your owner’s manual shows the exact spot.
-
Remove the glove box or cover
- Open the glove box and empty it.
- Press the glove box sides inward to release stops, or remove retaining screws.
- Carefully lower the glove box to access the filter housing.
-
Open the filter housing
- Unclip or unscrew the housing cover.
- Note how the cover and clips fit so you can reassemble easily.
-
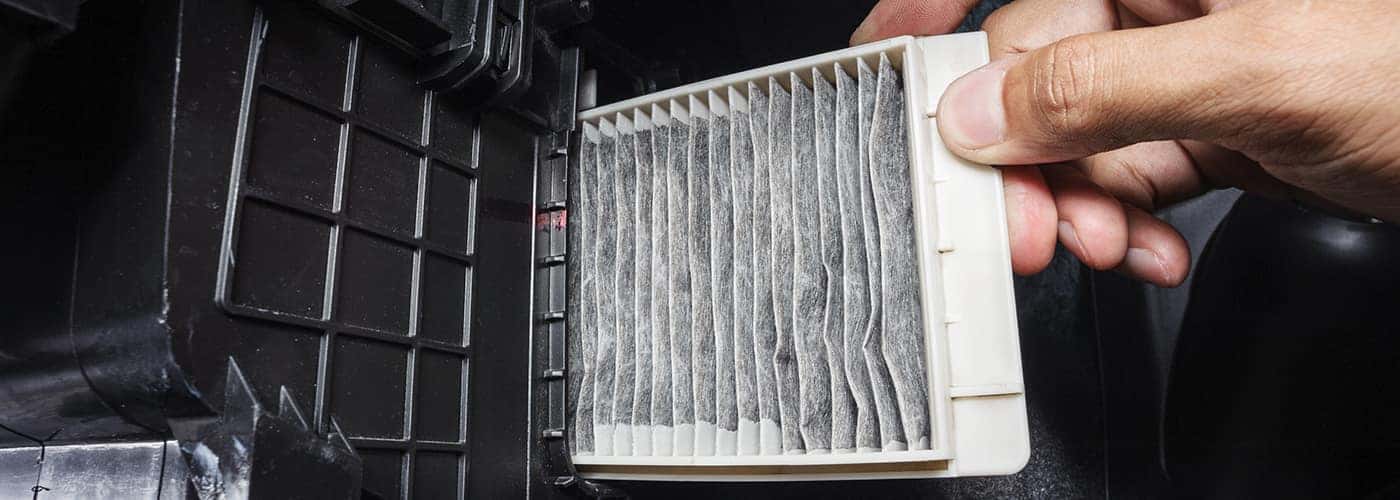
Remove the old filter
- Pull the old filter out slowly. Watch for dust and debris.
- Note the air flow arrow on the filter. This shows orientation for the new filter.
-
Clean the housing
- Use a vacuum or soft brush to remove loose debris from the housing.
- Wipe with a damp cloth if needed. Do not let water enter vents.
-
Install the new filter
- Match the airflow arrow on the new filter to the direction shown on the housing.
- Slide the filter into place, making sure it seats evenly.
-
Reassemble everything
- Put the cover back on and secure clips or screws.
- Lift the glove box back and secure any stops or screws.
- Start the car and run the A/C or heat to check airflow and noise.
If the filter area is under the hood, steps are similar: open the cowl, remove cover clips, swap filters, and reassemble. After my first few tries, I can change most cabin filters in under 15 minutes.

Types of cabin filters and how to choose one
Filters vary by material and function. Pick the right one for your needs.
Common filter types:
- Basic particulate filters block dust and pollen.
- Activated carbon filters reduce odors and some gases.
- HEPA-style filters capture very small particles for allergy relief.
How to choose:
- For allergies, choose HEPA or fine particulate filters.
- For smoke or strong odors, choose activated carbon.
- For daily driving in clean areas, a standard particulate filter is fine.
Price vs. performance:
- Cheaper filters still help airflow but trap less fine dust.
- Premium filters cost more but can improve air quality and comfort.
I usually pick a mid-range activated carbon filter for family cars.

Common mistakes and troubleshooting
Avoid these mistakes I learned the hard way. They will save time and keep your HVAC healthy.
Common mistakes:
- Installing the filter backwards. This blocks airflow and strains the fan.
- Not cleaning the housing before installing the new filter.
- Using the wrong size filter that gaps or bends.
- Over-tightening clips or screws and breaking plastic tabs.
Troubleshooting tips:
- If airflow seems weak after replacement, double-check the filter orientation.
- If you hear new noises, check for loose clips or pieces left inside.
- If odor persists, consider replacing the cabin filter with an activated carbon type and cleaning vents.
I once installed a filter backward and wondered why the A/C hummed louder. Reversing it fixed the issue in minutes.

Cost, where to buy, and time estimate
This is a low-cost, high-value maintenance task. It saves money compared to shop service.
Cost breakdown:
- Basic filters: $10 to $20.
- Activated carbon or premium filters: $20 to $50.
- Tools: often not needed if you have basic screwdrivers.
Where to buy:
- Auto parts stores and online retailers sell filters by car model.
- Dealerships supply OEM filters if you want factory parts.
- Big box stores also stock common sizes.
Time estimate:
- Typical job: 10 to 30 minutes.
- First time may take longer while you learn your car’s layout.
My fastest cabin filter swap is under 10 minutes. Plan 30 minutes the first time to be comfortable.
Maintenance schedule and tips to extend filter life
A few good habits will keep your cabin air clean longer. They also help your HVAC run smoothly.
Maintenance tips:
- Check the filter visually every 6 months if you drive in dusty areas.
- Replace the filter at recommended service intervals or when clogged.
- Keep car windows closed near heavy traffic to reduce soot buildup.
- Clean floor mats and interior regularly to reduce dust that recirculates.
Seasonal tips:
- Replace the filter before allergy season for best results.
- After long road trips on dirt roads, inspect and possibly change the filter.
From experience, replacing the filter before winter keeps defogging faster and HVAC less strained.

Safety and environmental notes
Handle filters and debris safely. Dispose of old filters properly.
Safety steps:
- Wear gloves to avoid touching trapped dust and allergens.
- Work in a ventilated area to reduce dust inhalation.
- Keep tools and parts away from children and pets.
Disposal:
- Old filters can go in regular trash if no hazardous material is present.
- Check local rules for disposal if filters are heavily contaminated with oil or chemicals.
I always bag the old filter before discarding to keep my trunk clean.
Frequently Asked Questions of how to change air conditioner filter in car
How often should I change the cabin air filter?
Most cars need a replacement every 12,000 to 15,000 miles, or about once a year. Drive in dusty areas or with pets may require more frequent changes.
Can I drive with a clogged cabin air filter?
You can drive, but reduced airflow and poorer cabin air quality are likely. A clogged filter can strain the HVAC blower and reduce defrosting effectiveness.
Is the cabin air filter the same as the engine air filter?
No, they are different. The cabin air filter cleans interior air, while the engine air filter protects the engine’s intake.
Do I need professional help to change the cabin filter?
Most people can change it themselves with basic tools and the car manual. Seek help if the housing is hard to access or clips break.
Will a new cabin air filter improve fuel economy?
A cabin filter change has minimal direct effect on fuel economy. It helps HVAC efficiency and reduces strain on the blower motor, which can slightly help overall system efficiency.
How do I know the filter is installed correctly?
Check the airflow arrow on the filter and match it to the housing arrow. Ensure the filter sits flat and the cover snaps or screws back securely.
Conclusion
You now know how to change air conditioner filter in car with clear steps, tool lists, and real tips. This simple job takes little time and protects your health, comfort, and HVAC system. Try it next time you notice weak airflow or odors, and mark a replacement date in your maintenance log. If this guide helped, subscribe for more easy car care tips or leave a comment with your make and model for tailored advice.